2024. 3. 18. 20:41ㆍSpring/Spring Security
[ 스프링 시큐리티 필터 ]
스프링 시큐리티에는 필터라는 기능을 제공한다. 필터는 HTTP 요청이 올 때 작동하며, 필터에서 원하는 값들을 받아서 추가적인 처리를 해줄 수도 있고 문제가 있다면 컨트롤러까지 요청이 오는게 아니라 필터 선에서 요청을 끊어줄 수도 있다.
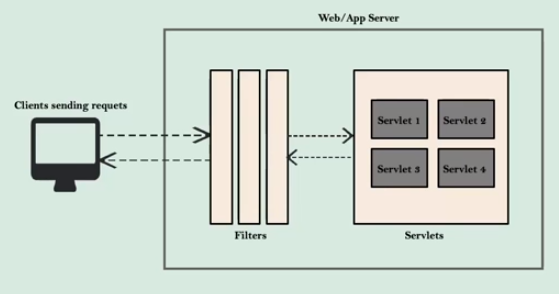
원하는 값과 내보내는 값은 HTTP 요청에 따른 서블릿 객체를 통해 사용이 가능한데, 그래서 filter를 살펴보면 다음처럼 doFilter()라는 메서드의 파라미터에 HttpServletRequest와 HttpS ervletResponse가 있다. 또한 filterChain은 다음에 어떤 필터에 해당 요청과 응답을 넘겨줄 지 정하는 역할을 한다. 따라서, 매번 필터를 작성할 때마다 어떤 요청에 있는 값을 사용하고 응답에 어떤 값을 전달할 지와 다음에 호출될 필터를 생각하면서 작성하면 된다. 필터를 작성할 때 그냥 필터도 있지만 OncePerRequestFIlter를 사용하는 걸 권장한다. 그 이유는 필터는 한번만 실행된다는 보장이 안되어있기 때문이다. 또한 이 부분은 공식문서나 다른 사람의 블로그를 찾아보는 걸 권장한다. 본인의 로직에 따라 필터를 세우는 걸 딱 잘라 정하기 어려운 부분이기 때문에 Filter의 사용 방법보다는 디버깅 방법을 알려주는 게 더 좋을 거라 생각했다.
public class AuthCheckingFilter extends OncePerRequestFilter {
    @Override
    protected void doFilterInternal(HttpServletRequest request, HttpServletResponse response, FilterChain filterChain) throws ServletException, IOException {
        Authentication authentication = SecurityContextHolder.getContext().getAuthentication();
        System.out.println("authentication = " + authentication);

        filterChain.doFilter(request, response);
    }
}
[ 필터의 디버깅 ]
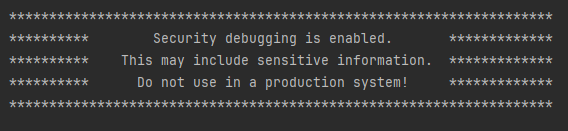
필터를 디버깅하는 방법에 관해서 알아보자. 첫 번째 디버깅에 관해서 추천하는 방법은 프로젝트 메인 클래스 위에 @EnableWebSecurity(debug = true)를 설정하는 것이다. 설정을 해놓았다면 어플리케이션을 띄울 때 다음처럼 메시지가 뜰 것이다.
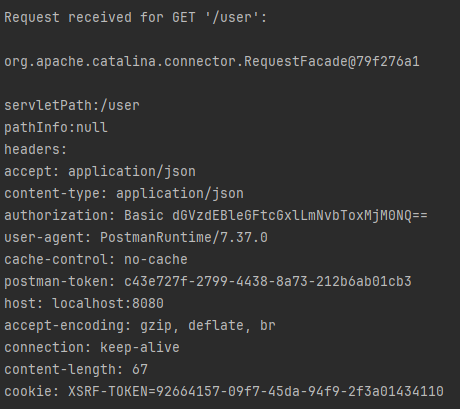
이 방법이 좋은 이유는 모든 요청마다 들어온 HTTP 요청 로그를 출력해준다. 그 내용에는 헤더와 바디 등에 어떤 값이 있는지에 관한 정보도 알려준다. 아무 메서드나 실행해보면 다음과 같은 화면을 볼 수 있을 것이다. 참고로 사전에 cors 설정으로 클라이언트와 서버 사이에서 일어나는 preflight 요청 정보도 여기서 확인할 수 있다.
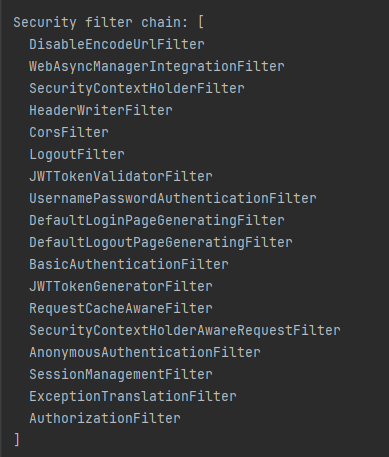
또한 필터에 관한 정보도 알려준다. 작동된 필터에 관해서 알려주지는 않지만 어떤 순서로 필터가 작동되고 있는지에 관한 정보로 내가 설정한 필터가 적용되었는지는 확인이 가능하다.
스프링 시큐리티 디버그가 이런 건 좋은데, 내가 적용한 필터가 올라가는 있지만 작동을 했는지 안했는지는 알기가 어렵다. 그럴 때는 디버거를 사용하면 된다. 아래의 설명에서 사용하는 필터에 관해 잘 이해가 가지 않는다면 여기서 필터를 놓는 부분을 다시 보자.
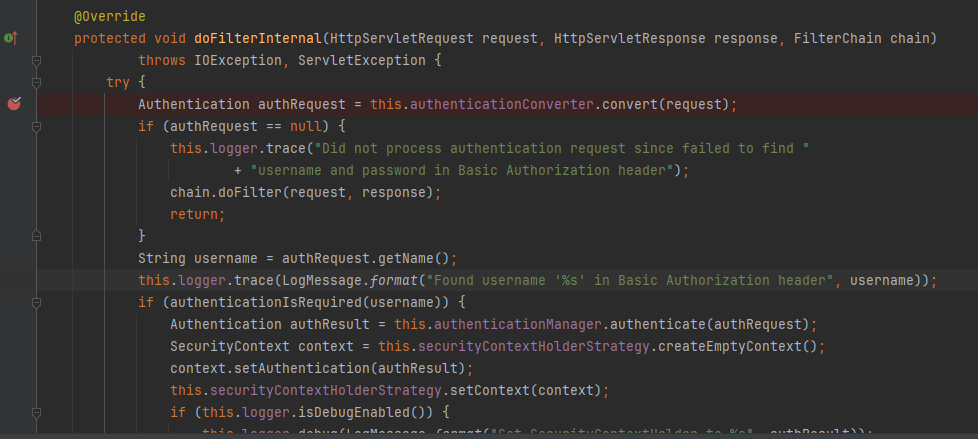
약간의 설명을 추가하자면 BasicAuthenticationFilter는 request를 Authentication 객체로 변환을 한다. 그리고 요청에 들어있는 username이 요청인증이 필요한 지 확인한다. 이 때 요청인증이 필요하다면 AuthenticationManager를 호출하고 그 AuthenticationManager는 우리가 임의로 지정했던 StudyAuthenticationProvider를 호출한다. 그러면 지정했던 로직에 따라 DB 내부에 us ername으로 정보를 찾아오고 비교를 해서 맞으면 UsernamePasswordAuthenticationToken을 반환한다. 그러면 basicAuthentication은 빈 SecurityContext에 감싼 뒤 securityContextHolder에 넣는다.
StudyAuthenticationProvider.java
@Override
public Authentication authenticate(Authentication authentication) throws AuthenticationException {
    String username = authentication.getName();
    String password = authentication.getCredentials().toString();
    Optional<Member> member = memberRepository.findByUserEmailWithAuthorities(username);
    if(member.isPresent()){
        System.out.println("member = " + member);
        Member findMember = member.get();
        if(passwordEncoder.matches(password, findMember.getPassword())){
            return new UsernamePasswordAuthenticationToken(username, password, List.of(new SimpleGrantedAuthority("ROLE_USER")));
        } else{
            throw new BadCredentialsException("Invalid password!");
        }
    }
    else{
        throw new BadCredentialsException("No user registered with this details!");
    }
}
그리고 JWTTokenGeneratorFilter가 다음 필터로 호출되 쓰레드 로컬로 구현된 Security ContextHolder 내부에서 authentication을 가져와서 JWT Token을 발급해 Authorization 헤더에 넣을 수 있었던 것이다. 그래서 아래의 코드가 나온 것이다.
JWTTokenGeneratorFilter.java
@Override
protected void doFilterInternal(HttpServletRequest request, HttpServletResponse response,
                                FilterChain filterChain) throws ServletException, IOException {
    Authentication authentication = SecurityContextHolder.getContext().getAuthentication();
    System.out.println("here generator");
    if (null != authentication) {
        SecretKey key = Keys.hmacShaKeyFor(SecurityConstants.JWT_KEY.getBytes(StandardCharsets.UTF_8));
        String jwt = Jwts.builder().issuer("Recfli").subject("JWT Token")
                .claim("username", authentication.getName())
                .claim("authorities", populateAuthorities(authentication.getAuthorities()))
                .issuedAt(new Date())
                .expiration(new Date((new Date()).getTime() + 30000000))
                .signWith(key).compact();
        response.setHeader(SecurityConstants.JWT_HEADER, jwt);
    }

    filterChain.doFilter(request, response);
}
이를 어떻게 확인했나? 이걸 물어보면 인텔리제이 디버거를 사용했다. 체크 포인트는 아래의 이미지처럼 두었으며 해당 체크 포인트에 들어온 값부터 계속 Step over 버튼을 눌러 다음 라인으로 이동을 했다. 그 결과 authenticationIsRequired(username)이 부분부터 위에서 언급한 코드의 흐름으로 작동하였고 다음 doFilter를 호출할 때 다음 필터로 JWTTokenGeneratorFilter 내부로 들어가는 것을 확인했다. 개인적으로 로그나 출력문을 사용하기 보다는 필터는 이렇게 디버깅하는 것을 권장한다.
BasicAuthentictionFilter.java
[ 참고 자료 ]
https://docs.spring.io/spring-security/reference/servlet/authentication/passwords/basic.html
Spring Security 6 초보에서 마스터되기 최신 강의! - Eazy Bytes
'Spring > Spring Security' 카테고리의 다른 글
| 스프링 시큐리티 4. 로그인 정보 갱신(RefreshToken 구현) (0) | 2024.03.25 |
|---|---|
| 스프링 시큐리티 - OAUTH2 (0) | 2024.03.20 |
| 스프링 시큐리티 3. 인가( JWT 기반 Token 인가 구현 ) (0) | 2024.03.17 |
| 스프링 시큐리티 2. 인증(AuthenticationProvider 작동 방식과 커스텀 AuthenticationProvider 작성) (0) | 2024.03.16 |
| 스프링 시큐리티 1. 암호화(PasswordEncoder를 통한 회원 가입 구현) (0) | 2024.03.16 |